We are already moving forward with the plan to earn $10 daily, I want to thank you and congratulate you if you have read all my posts so far. You will realize that this will really help you in team building.
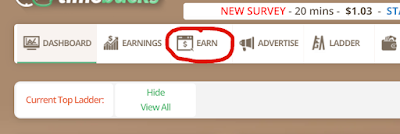
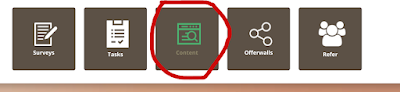
Today we are going to see the earnings option PUSH CLICKS, You can find this under the CONTENTS TAB in the same place as the ad clicks:
The push clicks option has been improved a lot recently and the earnings are a lot higher here now as well.
First of all the more you earned the day before, the higher amount you will get for each push click. For example if you earned $10 yesterday, you would get $0.05 per click. If you earned $1 yesterday you would get $0.005 per click.
You will get 12 paid push clicks per day, sent every 2 hours. That means a total of about $0.06 – $0.60 can be earned here (more if you earned over $10 yesterday).
In addition to that improvement there is a kind of lottery win option here as well. You can win $10, $5 or $1 in this lottery for completing a click instead of $0.005.
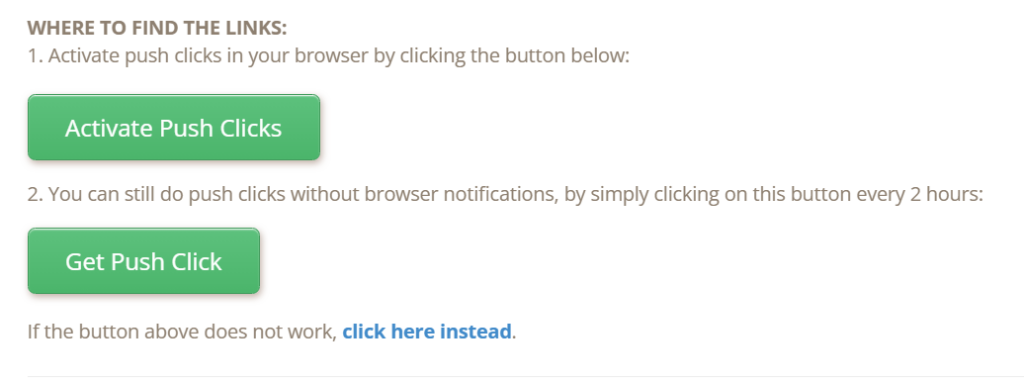
To overcome the issue of not being able to turn on the browser notifications that many people were having before, you can now simply click the button or the link provided on this page:
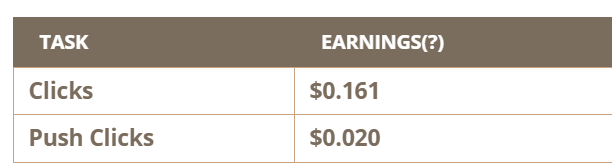
I try to do these push clicks as often as I can now. The chance of winning $10 for a single click is pretty exciting! I like that I can earn an extra $0.10 a day pretty easily from this option as I tend to earn around $0.02 per click at the moment:
So todays test is to go to the PUSH CLICKS option and see how many you can complete today. Remember you can only get paid once every 2 hours here…… Check to see the amount you are being paid for them and let me know below.
This is a section we can work on building up a lot for many people.
This is day 1 of “Make $10 a Day”, it’s a plan I have set up, it’s simple but can make a huge difference if you think about it and can help a lot of people online. It’s all about learning how to maximize your earnings using free sites.
To take part in this you need to have an account with Timebucks and be willing to work on it each day.
Step 1 is to work out a daily routine for yourself that allows you to earn $1 a day. I believe everyone can achieve this but might require a bit of coaching to reach it. If unable to reach $1 a day yourself then I will be able to create a adjusted plan for you so you can still earn $10 a day. The main thing is to earn as much as you can initially.
To help you work out the parts of Timebucks that you can use for this plan I am going to explore each part of the site individually and explain how to use it. I will also ask you to conduct a little test each day to help me understand the earning available in different countries:
How To Complete Ad Clicks on Timebucks
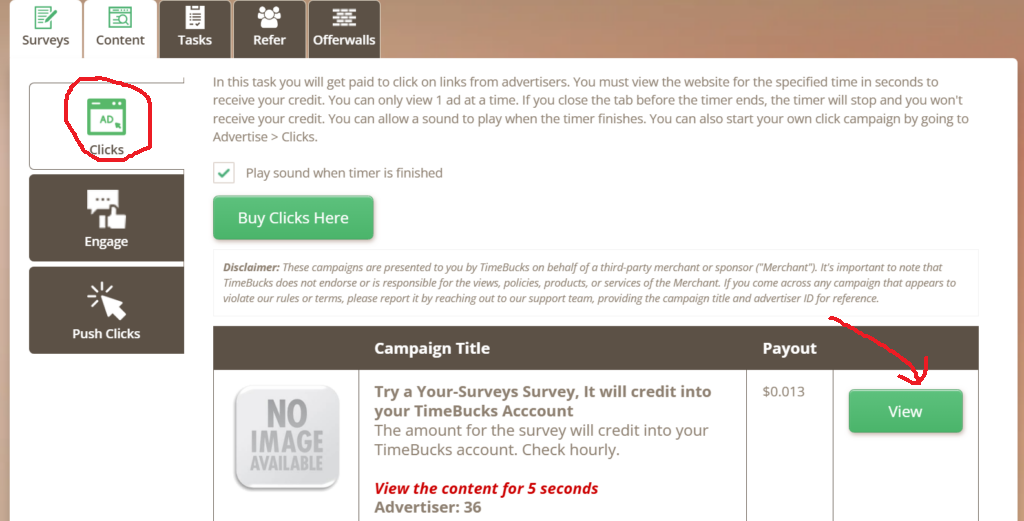
Click on the EARN TAB and then click on CONTENT tab. The Ad Click option is the first on the list:
Click on the green VIEW button and the ad will open in a new page.
You need to keep this page open for the time specified (5 seconds in the example ad shown above).
Return to the original page when the timer is finished. You will see the timer count down in the tab of the original page.
You will hear a Ka-Ching noise when the timer has completed and you have been paid.
You do not need to complete any action in the ad page that opens.
Return to the original page to start the next ad click on the list.
When you have completed all clicks available you will see the following notification:
Day 1 is about testing what you can earn just from completing the ad clicks.
Where you live is likely to affect your earnings a bit so it would be very helpful for me to know 4 things from each person working on this day 1 test:
Where in the world you are from
The total number of ad clicks you have been able to complete
The amount that you earned from completing those clicks
If you completed every ad click available or not
Please add that information to the comments section below.
In this post I will share the strategy to Receive more than 8 Referrals per day automatically without promoting your referral link and without clicking on credit ads!
Here below is the brief strategy how this system works:
To automatically get referrals assigned to your downline you will need to send/submit your ad every hour. Your ad can be anything you want to promote.
Gold members can send ad to more than 300,000+ members every hour!
Pro members allowed to send to 500 members every hour!
You don’t need credits to send your ad!
Every time you login you will receive visits to your website!
Just be sure to always keep a valid link in theZONE!
After sending/submitted a certain number of mailings in a 24 hour period, a downline member will automatically be placed under you.
Gold and Pro members will have a lower number of hourly mailings to do before they receive a new downline member than Free members.
You will be notified at the “mailing successful” page that you are directed to after submitting your Hourly Mailer ad when a member is placed under you.
Please follow instructions below to automatically receive referrals to your downline.
Prepare your ad you want to submit (Get your email subject line, email body and link ready)
STEP 3
Login (if not already) then click on “HercuList Members” from the top menu.
Then click on “Submit Ads” from the top right menu of the page.
Then click on “Ad Mailers” from the top menu of the page.
Then click on “Continue to Ad Mailers >” from the top menu of the page.
Scroll down the page, under “Regular Mailer (Daily) setup your ad by entering your email subject, email body and your link.
Now under “Use Regular Mailing (Daily) to submit ad” click on down arrow and select “HercuMail (Hourly)“.
Then lastly click on “Submit Ad“
STEP 4
Now you done. Repeat the process from step 3 every hour and after you submit your ad more than 4 times a day you will start getting referrals depending on your upgrade level.
Upgrade your membership to a LIFETIME GOLD membership for ONLY $49 and never pay another membership fee again. As an upgraded member you will have access to 100,000+ leads which you can download and use them to promote.
Infinity Traffic Boost, as its name suggests is a traffic site (and a very good one at that). Using it effectively will help you to get referrals for pretty much any opportunity that you wish to promote. Though you should not promote your referral link for ITB itself on the site as all members have already joined.
In addition to the advertising you get, when you surf for ad credits, you can earn a bonus each day that is added to your account in Bitcoin. You get paid a bonus share for each 10 pages that you surf. The bonus amount varies day by day depending on the value of Bitcoin. It is currently around 12 satoshi per share. If you surf 100 pages a day then you would earn 120 satoshi. Surfing 100 pages a day would pay you around 3600 satoshi per month.
That is just a few dollars……. so why bother doing it?
As with most online programs, the earning multiplies when you get referrals. Not only do you earn more satoshi each day when you have referrals who also surf, but you also open the door to earning 80% commission payments.
This commission option, along with the getting paid to surf feature, means you can surf your way to thousands of dollars (as much as $64,000 with just 4 active referrals).
The value of Bitcoin is literally sky rocketing at the moment and everyone wants a share of it. One of the easiest ways to get a decent amount of Bitcoin is provided by Infinity Traffic Boost….. all while you also promote any business or opportunity that you choose to work on.
In my book, that is a very good win win situation.
If you have joined already then make sure you are using the account on a daily basis. You can surf your way to a fortune…..
Do you want to use this post to help you get referrals?
You can easily use it as an email to send to your subscribers, or if you have joined our team on GDI already, why not use it to create your own blog post?
Writing posts like this one on a blog makes them VERY flexible indeed. In fact with a few small adjustments you can easily use this exact post to help you promote several different sites.
Mailer sites are a great way to get subscribers quite quickly. I tend to use them at the beginning of a new ad campaign, but I now prefer the automated system that traffic exchanges provide for long term list building.
Using both together will get you a much wider range of referrals.
The main thing you need to know about mailers is, as the name suggests, you will be sending emails. You should understand this is not the same as sending emails to your own list. These emails will be going to people who likely don’t know who you are – this is called COLD TRAFFIC. This means sending a completely different kind of email……
I will be providing multiple emails that you can send on mailers, BUT I recommend you edit these to make them different to everyone elses emails.
Emails that you send on traffic mailers should be SHORT, CLEAR and include a CALL TO ACTION (such as click here for info). Most of the emails sent via mailers are NEVER ACTUALLY READ so don’t waste time writing long emails for them. You should also change your email frequently. I rarely send the same email twice….
I will keep adding new emails to this blog as and when I send some out myself.
Mailer Emails
Subject: 100 Paid Referrals System
Email:
We all know that getting paid referrals is the key to success online. It is not always easy to achieve that, but pretty much every marketer is trying to.
If you would like to try out a system that gained over 300 PAID referrals in January 2024 then just click the link below. I will happily provide proof that it works, and all the guidance you will ever need to succeed.
(Insert Capture Page Link)
Best Wishes
(Your Name)
Recommended Mailer Sites
These are my favourite mailer sites that I always use for every campaign:
(These are my personal links, you might like to ask your sponsor for their links)
When you have your Leadsleap system all set up, the only thing you have to do next is to generate traffic to the Lead Capture Page.
The first traffic site I always recommend and use for any new campaigns myself is Hungry for Hits.
You will find the guidance on how to add a capture page link to Hungry for Hits in this blog post: Team Building First Steps
You can stick with just using Hungry for Hits, or you can add your page to more and more traffic sites. Doing this will get you more subscribers and more referrals much faster than only using a single traffic site.
My advice is to work on a few traffic sites at one time, and aim to earn the upgrade from surfing (or of course use your own funds if you prefer). Upgrade on 1 site, let that take care of your traffic on autopilot, then add another site to your routine. Keep following that routine and you will soon have a huge amount of traffic.
I will add a new post to this guide for using mailers ASAP…… and will provide some emails you can use too.
Before you start promoting your lead capture page, you need to add a welcome email to the system. This will be sent out automatically when you get a new subscriber adding their details into the lead capture page.
To add the welcome email click on LIST MANAGER and then click on the single envelope icon and the welcome email editor will appear.
Click the pencil icon and then copy and paste this email:
Subject: YOU can get 100 Paid Referrals
Email:
As I am sure you know already, getting paid referrals is the key to earning a decent income online. I am sure you also know that getting paid referrals is not always a very easy thing to do.
Para ayudar a superar esta barrera principal para el éxito, Ellie Murphy (mi amiga y colega de trabajo en línea) creó un tipo de sitio web muy diferente basado en una estrategia simple.
Ellie has worked online for years, and has built many teams of 1000+ people. Creating Team Build Machine is her way of removing as many barriers to online success as possible.
If you want to become a Team Build Machine you can join for free using this link:
Save the email and you are ready to start promoting your lead capture page.
Remember that Team Build Machine is the FIRST site that you want your referrals to join. Those referrals will then follow you forward into the paid programs.
When you have saved the welcome email, you should check the system is set up correctly. To do this copy the link of the lead capture page, enter it in a new window, and add your own details into the form.
You should get a notification to check your email to verify your email address.
Complete the verification and a copy of the welcome email will arrive in your inbox. If this does not happen go back over the set up guide and check your steps.
When you know everything is working, the next step is to:
You should ADD this page to your promoting routine and keep sharing the One Team Page as well.
You will be importing this page into your account on Leadsleap.
To do this click on PAGE MANAGER then ADD PAGE. You will be asked to give the page a name:
I suggest you use “100 Referrals Challenge” as the name for this page. When you click Add the page will be added to your list:
Next click on the Add a new page design to start button, and you will see the 2 options below:
In the import share code box enter this code: page-afkMVGGZZZZ click on Import Now.
You will now have a copy of my Lead Capture Page inside your Leadsleap account and it will look something like this (the link will be different):
You are going to see an error message that says list does not exist. We will fix that next…. That is the first part of the set up done, easy right?
Now you need to create an email list in Leadsleap. This is very easy too.
Click on LIST MANAGER, then Add New List. Call it 100 Paid Referrals and then click add now. Boom, you now have an email list!
When you add the list you will see a red notification like this:
Click on the little cog icon and a form will pop up for you to complete. You need to add your own details and email address to this form. Click the button to send a code to your email address after adding your address, go copy the code and enter it in the code box.
Fill in the rest of the details, and make sure you click the little box to agree the terms, then click activate now button:
Your email list will now be active and ready to connect to the page you imported.
To connect the 2 together, you need to open the page manager again and click on LAUNCH EDITOR.
In the editor window, click on LIST then GET LIST ID
Choose your new list from the drop down menu and the ID will appear in the box.
Click on the green save button in the top right corner, and your page and list will now be connected.
The first traffic site that I recommend you use to start driving traffic to your capture page is called Infinity Traffic Boost. Not only is this a very busy site with a huge amount of members, it is very easy to use, and not expensive either. I always get a lot of subscribers joining my email list from this site.
To add your capture page to Infinity Traffic Boost will take just a couple of clicks. First, log in to your Leadsleap account, click on PAGE MANAGER and copy the url of the capture page you wish to promote.
The url is at the top of your page in the page manager highlghted in blue:
Copy the link address (in this case it is https://lllpg.com/h2p6ck7y/) and then log in to your account on Infinity Traffic Boost. Click on Get Exposure, then Promote Pages. Scroll right to the bottom of that page and you will see the + Add Campaign URL button as shown in the image below:
In the popup box paste the url of your capture page in the box, then click on the URL Tested slider button where it currently says NO. This will test the page is ok to add to the site.
After you click the slider button, it will show as YES and the Test Successful notification will appear. You will also see a small preview of your page in the box under that.
Click on the Save Campaign URL button, and this adds your capture page to the advertising section of Infinity Traffic Boost.
IMPORTANT – You Must Have Ad Credits for your page to be seen by other members. You can purchase ad credits, or you can surf other member ads to earn ad credits.
Purchasing Ad Credits on Infinity Traffic Boost
There are many different ad packages available on this site, starting from just a few $$. To purchase an ad package click on BUY TPO button in the main menu, then scroll down the page until you see the order form:
The price of TPO1 is around $3 (it changes based on the value of Bitcoin). You can also purchase traffic packages using your account funds, and this will give you a discount. Choose the ad package you wish to purchase and then scroll down until you see the Add to Cart Buttons. Choose the one you wish to use and click it. The ITB Funds one is easiest, and you can earn the funds by surfing ads daily.
When you have purchased ad credits your capture page will be shown to other members. If they are interested in your offer they add their details to the capture page and become your email subscriber. You can then send emails to them completely free of charge to promote ANY site or affiliate product etc that you wish to work on.
The more you promote you capture page, the more email subscribers you will get, and the more referrals you can gain over time.
Surfing For Ad Credits (and Funds) on Infinity Traffic Boost
To surf for ad credits, which will also add funds to your account, click on the SURF PAGES button in the main menu. The first thing you will see is a captcha to complete:
After completing the captcha the first ad page will automatically open, and you will see a timer at the top of the page. When the timer finishes, you will see a notification to click on a specific colour box to verify your page view.
You will also see the number of pages surfed today, the ad credits earned and the total number of ad credits you have available in your account:
If you surf at least 10 pages you will qualify for the daily bonus payment. The more you surf the more you will earn (you get a surf bonus share for every 10 pages viewed).
Note this bonus payment is added to your account at midnight so you will see it the following day in your account.
If you want to use surfing to pay for your account upgrade (which I highly recommend if you are a free account member), then you should aim to surf at least 100 pages a day. It takes a bit of time, but the upgrade is well worth working on. It will make team building a lot easier for you, and will earn you more in the long run.
To speed up your earning you should also work on getting active referrals.
Monitoring Traffic Levels
To set up a fully automated team building system you will need to upgrade on Infinity Traffic Boost, and you will need to work on continually increasing your traffic levels and results.
You do this inside your Leadsleap account. Click on the PAGE MANAGER and then on the little graph icon under the capture page link. This will open the detailed statistics section.
The first thing you want to work on is reaching 100 hits per day, then aim to keep increasing that number. If you do this, you will get more and more subscribers joining your email list.
In the stats by source section you will be able to see the number of email subscribers who have joined your list from each traffic source you add.
ALL of my traffic costs have been paid for by using my free earning sites and methods like surfing on ITB.
Learning to pay attention to these stats will make you much more effective as a team builder and affiliate marketer. I will cover more training on this topic in future blog posts.
Today I want to focus on getting you started, and explain a little more about why you should use an account with Global Domains International to do that.
Why Use Global Domains Internation (GDI)?
One of the reasons that I choose to work with GDI and recommend them to others is the fact they provide very low cost hosting for a wordpress blog. Many providers charge up to $500 per year paid as a lump sum for this, and GDI is the only provider I have found that offers a monthly payment option of just $10. Some providers offer lower monthly amounts, but ask for it to be paid for up to 3 years in advance. With GDI you pay nothing to get started, then just $10 after the free 7 day trial, so it is much easier on the pocket. That makes it much more accessible for beginners in my opinion.
In addition GDI is an affiliate marketing business in its own right, and has been around for over 15 years. This account is set up to help you learn more about affiliate marketing, and provides various tools and training to help you get started too.
Another great thing about GDI is it offers you the chance to get all sorts of bonus payments. For example there is a $25 bonus available for making your first affiliate sale of just $10. There are other $100 and $250 bonus payments too.
I plan to teach you how, and to help you reach earnings of $1000 – $10,000+ per month with GDI. Yes, in addition to providing the blog itself, which you will use to promote various affiliate offers, GDI is the first affiliate program we wil be working on together.
WordPress is the most powerful blogging platform available, and you can do practically anything you want with it. It is the most stable and reputable platform around as well. Starting with this account means you won’t have to move your blog later when you realise you need more features than other providers offer.
How To Activate WordPress Via GDI
Setting up your GDI account to use as a wordpress blog is quite simple and will take a few easy steps:
In the main menu click on the button that says WordPress and More
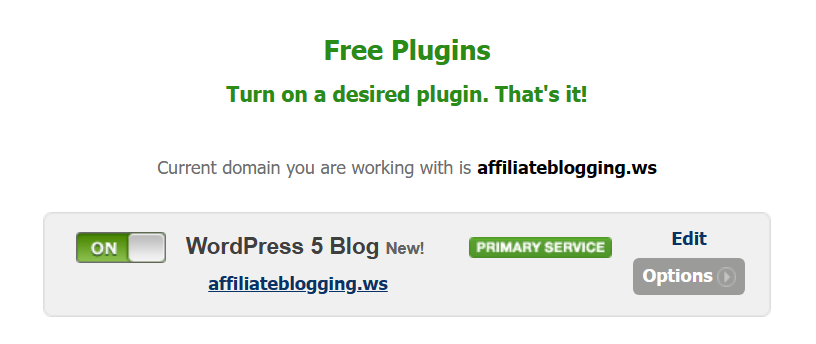
On the WordPress page you will see there is a list of plugins, and WordPress is the top option on the list. Simply click on the button to turn this plugin on. I recommend you choose this as your primary service as well – this will make your blog the site that is shown at the main url address.
After turning on the WordPress plugin, it will take around an hour for the site to update. You won’t be able to log in until this happens and you will be sent an email notification when it is ready.
When the update has finished you can login to your wordpress using the EDIT button on the plugin page inside GDI. The first time you do this there will be a few basic questions for you to answer, such as which language you wish to use and the title for your blog. Your password is the same as your GDI one.
When this is done, you will be able to log in to the WordPress dashboard. This is where you write the blog posts and update settings etc.