WordPress Blog Set Up with Global Domains International

Today I want to focus on getting you started, and explain a little more about why you should use an account with Global Domains International to do that.

Why Use Global Domains Internation (GDI)?

One of the reasons that I choose to work with GDI and recommend them to others is the fact they provide very low cost hosting for a wordpress blog. Many providers charge up to $500 per year paid as a lump sum for this, and GDI is the only provider I have found that offers a monthly payment option of just $10. Some providers offer lower monthly amounts, but ask for it to be paid for up to 3 years in advance. With GDI you pay nothing to get started, then just $10 after the free 7 day trial, so it is much easier on the pocket. That makes it much more accessible for beginners in my opinion.

In addition GDI is an affiliate marketing business in its own right, and has been around for over 15 years. This account is set up to help you learn more about affiliate marketing, and provides various tools and training to help you get started too.

Another great thing about GDI is it offers you the chance to get all sorts of bonus payments. For example there is a $25 bonus available for making your first affiliate sale of just $10. There are other $100 and $250 bonus payments too.

I plan to teach you how, and to help you reach earnings of $1000 – $10,000+ per month with GDI. Yes, in addition to providing the blog itself, which you will use to promote various affiliate offers, GDI is the first affiliate program we wil be working on together.

Click Here To Register with GDI If Not Already Joined My Downline.

Why Do You Need WordPress?

WordPress is the most powerful blogging platform available, and you can do practically anything you want with it. It is the most stable and reputable platform around as well. Starting with this account means you won’t have to move your blog later when you realise you need more features than other providers offer.

How To Activate WordPress Via GDI

Setting up your GDI account to use as a wordpress blog is quite simple and will take a few easy steps:

First of all, click here to log in to your GDI account.

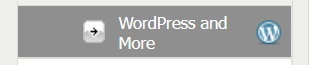
In the main menu click on the button that says WordPress and More

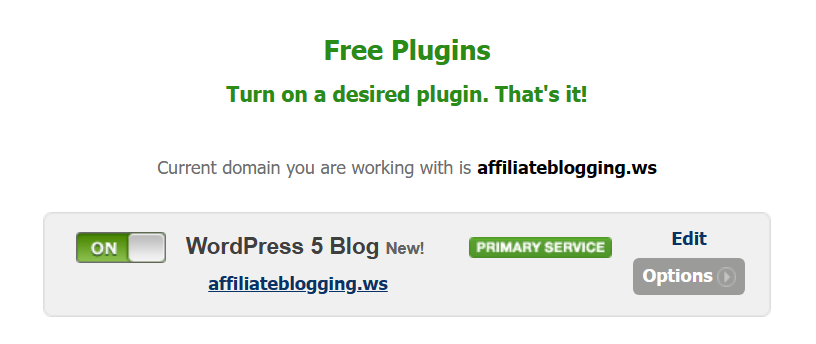
On the WordPress page you will see there is a list of plugins, and WordPress is the top option on the list. Simply click on the button to turn this plugin on. I recommend you choose this as your primary service as well – this will make your blog the site that is shown at the main url address.

After turning on the WordPress plugin, it will take around an hour for the site to update. You won’t be able to log in until this happens and you will be sent an email notification when it is ready.

When the update has finished you can login to your wordpress using the EDIT button on the plugin page inside GDI. The first time you do this there will be a few basic questions for you to answer, such as which language you wish to use and the title for your blog. Your password is the same as your GDI one.

When this is done, you will be able to log in to the WordPress dashboard. This is where you write the blog posts and update settings etc.

http://yourdomain.ws/wp-login.php

This is the first post to add to your new blog: https://clickstoprofits.ws/2024/11/13/done-for-you-affiliate-marketing-first-blog-post/ After that, it will be time to start promoting and to work on building your own following. These are the first steps to becoming a successful affiliate and I will teach you step by step what you need to do.

Related Posts
How to Earn Money With CoinPayU

CoinPayU is a site for easily earning money by viewing ads and receiving paid offers. These are the two main Read more

Earn $10 Daily – Day 2

We are already moving forward with the plan to earn $10 daily, I want to thank you and congratulate you Read more

Done For You Affiliate Marketing – Welcome Email

Hopefully by now you have your blog set up, your first post published and your lead capture page and email Read more

How To Create An Email List In Leadsleap

To create an email list in Leadsleap takes just a few minutes, and you need to do it to store Read more

How To Add A Welcome Email To A Leadsleap Email List

The final step to preparing your automated lead generation and email system on Leadsleap is to add the emails you wish to be sent out.

The first email is the most important one, as this can make or break your relationship with the new subscriber in seconds. You only get one chance to make a good impression so think carefully about what to put in your welcome email. It should be used to provide the subscriber with some information, but not too much or it can appear overwhelming. It should be friendly and encourage the subscriber to open your next email as well.

To add the welcome email click on LIST MANAGER then click on the single envelope icon beside the cog. This will open the welcome email editor box:

To edit this message click on the pencil icon as shown above. You can then write whatever you wish into the welcome email. Below is an example welcome email that I use:

In addition to the welcome email you can write a whole series of emails to be sent out automatically to your subscribers. This feature is only available to upgraded members of Leadsleap. To use it simply click on the double envelope icon and enter the emails you wish to be sent out each day.

Related Posts
Done For You Affiliate Marketing First Blog Post

Below is the first blog post that you should add to your new wordpress blog. Click Here if you have not Read more

How To Start A Blog That Earns Daily Cash

Starting a blog that earns daily cash is not difficult at all. It will take you around 10 – 30 Read more

Get Lifetime Traffic!

Would you like to get lifetime traffic for your sites?Here are 4 ways to get it: 1. Find codes for Read more

3 Simple Steps To Earn $500 A Month.

>> Open This Page in a New Tab or Window << It seems too difficult to make $500 a month, Read more

How To Connect A Lead Capture Page To An Email List In Leadsleap

After importing a copy of my Lead Capture Page (or creating your own), you need to make sure it is connected to an email list before promoting or the contact details will not get stored for you.

To connect the page to your list click first on PAGE MANAGER and then click on the Lauch Editor button underneath the list:

In the editor menu click on LIST which is the second option from the top:

In the list section choose Use Sendsteed then click on the Get List ID button. This will open a drop down menu where you can select the list you wish to use with this capture page.

When the list number is showing in the Enter List ID box make sure you save these settings. The save button is at the top right of your screen:

You have now connected the Lead Capture Page to your email list.

I recommend you test the system is working correctly before you start promoting it. To do that simply add the page URL into a new window and enter your own details in the form.

You should see a notification to verify your email address:

You can now add a welcome email that gets sent out as soon as verification has been completed by your new subscriber.

Click Here For Instructions On Adding Your Welcome Email

Related Posts
Building Passive Income Online (Day 5)

This is day 5 of the guide to building passive income and today we are going to talk about automating Read more

How to make money with Unlimited Mail Profits

Unlimited Mail Profits is one of the best sites I've found in recent months, as it provides multiple benefits for Read more

Earn $10 Daily – Team Building Training Part 2

In part 1 of my team building training I explained the need to provide specific types of information to new prospective team Read more

How to Earn 100 a day! – Set Up

This is an automated profit system you can set up and is perfect for those just starting out in this Read more

How To Create An Email List In Leadsleap

To create an email list in Leadsleap takes just a few minutes, and you need to do it to store the contact details of your subscribers. When people enter their details into the Lead Capture Form they are stored in this list.

First click on the LIST MANAGER in the main menu, then click on the Add A New List button:

In the pop up box you need to give your list a name. I recommend you give this the same name as you have given the capture page that is going to be linked to it.

When you have added the list it will then need to be activated. To do that click on the little cog icon under the red text as shown below:

To activate the list you will need to complete the list customisation form with your own details. You also need to provide and confirm an email address where your subscribers will be able to contact you:

When you have completed the form click on check box to agree to the terms of use, then click the SAVE AND ACTIVATE button at the bottom

The list should now be showing as active:

After creating the email list you will need to connect it to the Lead Capture Page before you start promoting.

Click Here For Intructions To Connect The Lead Capture Page To The Email List

Related Posts
Earning Bitcoin on Infinity Traffic Boost

Infinity Traffic Boost, as its name suggests is a traffic site (and a very good one at that). Using it Read more

How to Earn $10 a Day!

This is the simple system for making $10 a day. I launched this system to help everyone make money and Read more

Earn $10 Daily – Day 5

At the moment I am focusing on using Timebucks for the $10 a day club plan (I will discuss other sites later). Read more

My Plan to Turn $5 into $10,000

Starting today, I have set a plan to make $10,000 with a $5 deposit. This plan may sound a bit Read more

How To Import A Lead Capture Page In Leadsleap

To import a lead capture page into Leadsleap is very easy and takes just a few clicks.

Click first on the PAGE MANAGER link in the main menu and click on the Add A New Page button:

In the popup box enter a name for your new lead capture page and click the Add Now button:

Click on the Add New Design To Start Button:

In the pop up box enter the page share code and click on import now:

The page will now be showing inside your Page Manager on Leadsleap.

Remember to create a new email list and connect it to the Lead Capture Page before you start promoting it.

Click Here For Instructions on Creating A New Email List

Related Posts
My Plan to Turn $5 into $10,000

Starting today, I have set a plan to make $10,000 with a $5 deposit. This plan may sound a bit Read more

Earn $10 Daily – Day 4

I do hope you are finding this daily look at the earning options on Timebucks to be useful. So far Read more

How to Earn 100 a day! – Set Up

This is an automated profit system you can set up and is perfect for those just starting out in this Read more

Building Passive Income Online (Day 5)

This is day 5 of the guide to building passive income and today we are going to talk about automating Read more

;